
Bike type
First things first: you need to figure out what type of a bike you are shopping for. Main driver behind this decision is going to be what do you plan on doing on it. After all, you probably won’t go down a rocky hill in the woods on a bike with weak breaks and few speeds now, will you? So here are types of bikes you are looking for and their main features:Road – you can usually spot these guys by the drop handlebars. Road bikes tend to be light with skinny tires. They are great for zooming along on paved roads! However, if you will be going on unpaved roads, they are tough to handle and they don’t have much in the shock absorption department. Take my word for it 😅
Mountain
I feel like these guys can be spotted best by big tires with deep treads, which makes them great for rough terrain and going through obstacles. They tend to be good in shocks department, too, since you are expected to be hitting bumps. You can definitely ride a mountain bike on a paved road as well, but it is much heavier, so you will go slower and tire faster. It’s also a pain if you live a few floors up and have to frequently carry it up and down the stairs 😜
Touring
They are sort of like long-distance road bikes. They are meant for long rides (makes me think of my friends touring France on bikes) and offer a better riding position (you don’t want back pain from riding for hours and hours on end day after day). Touring bikes also offer mudguards and mounts for all the stuff you’ll be bringing on your trip. So when you hear ‘touring bike’, stop thinking about being a site-seeing tourist in a city. It’s the long trek through the countryside.
Hybrid
It’s not a coincidence that this type is fourth on the list, as it’s a hybrid 😋 of the previous three. They are lighter, like road bikes, but their tires and shocks are good enough to go on dirt roads. And last but not least, they get comfy seats and higher handlebars from the touring bike for comfort. This may not be a bike you would pick for that century ride you’ve been eyeing or for your trip down a mountain, but it tends to be the best choice for your day-to-day riding around town (especially if you live in a place with horrible roads)
Adventure /gravel
It’s a road bike with a few options extra, like ability to handle non-paved roads. One feature that they need is larger clearance for the wheels, so you can replace road tires with mountain ones if necessary
Triathlon/ time trial (TT)
These guys are like your road bike on steroids. Usually you can spot them by the aero bars – those are the ones that stick out forward. Tri bikes are built with focus on aerodynamics and speed at the expense of everything else, such as comfort or good breaks. They also tend to be really expensive. Basically, your tri bike is for people who well know what they are going for. Oh, and a friendly warning on aero bars: they make you more wobbly and make turning more ‘fun’. I might have to write a whole another article on that though LOL
Track
Leave these guys for pros in the velodrome… Great for aerodynamics, but their gear is fixed, meaning that you can’t coast on it. They also sacrifice everything for the sake of speed, which means that they don’t have breaks. You have to stop them by forcing pedals to stop
Cyclocross
They remind me in many ways of the hybrid bikes in that they share features of road and mountain bike. Unlike hybrids, they are meant for racing rather than comfort, so don’t look for wide seats and raised handlebars
Cruiser
I feel like cruisers are the bike of choice for commercials! They tend to be cute and comfortable. Well, comfortable to a point – they have few (more like one?) gears, so stick to flat roads on these. But if your goal is to just ride leisurely along the beach? Go for it!
BMX/ trick
Just another bike where if you are shopping for it, you know exactly what you are getting yourself into. They have low seats, usually one speed and are meant for tricks and stunts, not really riding
Folding
I think they look hilarious! A folding bike definitely has it’s time and place. It’s an awesome idea if you commute and then have a bit to walk at the end or just to run short errands. It’s easy to carry around and store. Drawback? Folding bikes have tiny wheels and are not ideal for long routs and hills
Recumbent
I find it hard to remember that people on recumbent bikes are working hard, too! After all, it’s not easy to take somebody stretched out like they are on a lounge chair seriously. And maybe that’s right. But then again: they can’t use their body weight on hills. I think I need to try riding one some time – they look intriguing!
Tandem
Meaning bike built for two. I think it’s great, so that you can take advantage of a stronger rider 😉. On the other hand, taller person sits up front. As a small person, I think I would have to be with a child to get to sit in front. So you get to stare at somebody’s back the entire ride long. I was also told that figuring out how to pedal at the same rate can be tricky in the beginning
E-bike
It’s like a normal bike, but it has a battery to help you pedal. I have a hard time taking them seriously, since using electric motor feels like cheating. On the other hand, they are helpful if you are not in great shape, live somewhere hilly or need to pull heavy load. I think of it in terms of living in bike-friendly area and taking your kids to daycare by bike. It’s awesome, but some hills may be a bit much with a kid in a trailer
Price range
Make sure you know what you are planning to spend. It probably helps to look online before heading out the door what the prices are on the type of bikes you are interested. It’s easy to get a sticker shock if you don’t know what to expect. Another benefit of knowing what’s your budget is help in choosing where to go shopping. If you want the cheapest possible bike to run errands, then Walmart may be just the place for you. On the other hand, if you are looking for something serious, you need to be prepared to spend good amount of money at a good bike store.
Bike size
I hope you have a good idea what bike you are looking for now. Next step: choosing the right size. I didn’t appreciate this issue much when I was younger and didn’t ride as much, but with every additional mile I gain new understanding for wanting a proper fit.
Step 1:
Most places will give it to you based on your height. Don’t be deceived! Measure your inseam leg length. Your height may put you somewhere in the ‘grey area’. The other issue is that we don’t all have the same proportions. Some people are ‘all legs’. And then there are people who have surprisingly short legs. Inseam leg length may be more accurate.
Step 2:
Consult the chart:
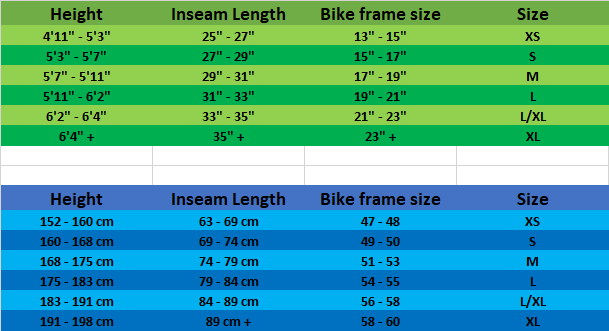
Use it as a guide, not a gospel, especially if you are on the border between two. I always face this issue. On a larger bike, you can get into a more aerodynamic position. You can go faster. But… It’s harder to get on/ off a larger bike. You have to be sure you have sufficient clearance to do that safely. Experts advise that about 2 inches (5 cm?) is about right. You should also make sure that length of the bike is right. It’s easier to adjust seat height than how far your seat is from your handlebars.
Bike fit
So there is one more thing after the bike size you need to pay attention to: bike fit. This is for once you have your final bike – you know, the small tweaks.
Why is it important? I am glad you asked! Obvious first answer is: comfort. You don’t want to be awkwardly reaching for the handlebars, do you? Or have your butt always above your head because your seat is really high, while handlebars are low? There is a much more important issue with the fit though: safety. And by that I mean avoiding injuries. For example if your seat is at a wrong height, your legs will bend outwards and you can seriously hurt them over time.
Depending on the type of the bike, there are different things to consider, but one thing you will need to always adjust is:
Seat height and tilt
Easiest adjustment out there! Haven’t we all done it when we had our kid bikes and kept growing… Hopefully you can do this in a safe environment, like at a bike shop where they can put your bike on a stand. You don’t want it to fall over while you are trying to get on it!
Put your butt on the seat and put your heel on the pedal. Can you reach it? Is your knee bent? What you are going for is reaching with your heel while your leg is straight. Adjust accordingly.
Your seat should be flat. I am sure you can imagine on your own why it shouldn’t tilt towards the back (ouch! It hurts just to think about that!). You don’t want it sloping forward, which would lead you to always slide just a bit forward and require you to use your arms a bit more to stay up.
Reach to handlebars
Are you now sitting comfortably on the seat? Great! Time for stage 2 of adjustments: handlebars. Reach for them, including breaks and gear shift. Your arms should be stretched out with elbows slightly bent. Please don’t overextend your elbows (like ever). It’s really easy to break them (in case you crash on a bike, which statistically will happen sooner or later) and hard to fix them. Your core should be able to hold up your torso, so make sure the handlebars are high enough for that.
Height of your handlebars isn’t the only part of the reach though, is it? Make sure that your seat is int he right position. As a general rule, the clamp should be in the middle of the seat. You may need to slide it a bit towards the back or front, but nothing significant. Remember: the goal is for you not to place all of your weight on your hands.
Cleats
Let’s just say I am guilty of not paying enough attention in this department…
I want to start by arguing in favor of the cleats though. We all start with just open pedals as kids and that’s great. For majority of people that will work fine for their whole lives. Once you are getting more serious though, get cleats. When I first starting riding road bikes, I got toe cages. DON’T DO THAT! They are mentally easier to switch to, but in reality, they are so much harder to use safely than cleats! When something is going on, you have only one way to get your foot out and it’s a pretty large moves. Cleats require only a not-so-hard sideways tug. A lot easier in case of an emergency!
Tension
Speaking of a not-so-hard tug: this is one of the top issues to pay attention when you are installing cleats – tension. You need it set up hard enough that your cleats stay attached to the bike while you are riding, but not so hard that you can’t get your foot off when you are trying to stop. Take my word for it, I have tipped over at 0mph before due to not being able to get my foot released 😅. It’s a little screw you can easily twist a little bit. Small adjustment, huge difference.
But before you get to adjusting tension, you need the cleats put on your bike. I will be honest: I always had the shop do it for me. That doesn’t mean I don’t know the theory though 🙂.
Location
Fore/ aft – it belongs in the middle of the ball of your foot. If you want more power for sprints, you can make is a bit more forward. If you focus on riding for a very long time, move it a bit back. Simple enough, right?
Float – this is for the rotational position, which is angle at which your foot should be. Now that I think about it, I may need to make a bit of an adjustment too my cleats on this one…
Roll – It’s whether your foot needs to me at an angle side to side. I tried to figure this one out, but at the end of the day advice is: seek professional help. I suspect that once you figure it out, you may be able to just follow the same pattern in the future.
Stance width – trial and error… when you don’t have cleats, you can move your foot as much as you want in search for comfort. When your feet are strapped in, you have to make sure they are in teh right spot from the beginning. This is a bit of a trial and error process and may take a while. General advice: IT band issues can be helped by increasing the width, while knees going inward call for a narrower stance.
Enjoy your rides, stay safe and I will see you on the road!